/* */ Beulah Bee: gel pens
Showing posts with label gel pens. Show all posts

February 03, 2023

Time Goes

After a month-long absence from posting, I bring you my first bit of crafting for the new year using an image inspired by, no surprise, how quickly time goes by.

After printing, I masked the child and clock then stamped (Hero Arts Succulent Bouquet) into the background using gray archival ink. For tinting, I used water-soluable oil pastels and a white Signo Uni-ball pen to highlight the dress lace.

I sanded some areas to give it a more distressed appearance and fussy-cut around the flowers before mounting on a piece of Paper Stash.

The text came from a song recorded in 1969 by Fairport Convention called "Who Knows Where The Time Goes." Here's a link if you'd like to take a listen.


As always, I hope this post finds you well and happy and I appreciate your visit.

Until next time, take care.


May 10, 2022

Daylight Dreams

Greeting Card

Sharing a greeting card today that was an experiment using a white Uniball Signo gel pen (first time using one). After stamping (Simon's Sunshine Flowers) with gray archival ink on a scrap of Tim Holtz Paper Stash (Memoranda), I filled-in the image with the pen then applied tinting over the top.

The gel pen ink isn't waterproof so I had to isolate the layer with an aerosol acrylic medium. Tinting became more challenging now that the paper lost it's absorbancy but at least the white ink didn't run.

I glazed over the image with some original, liquid Clear Rock Candy Distress Stickles (unfortunately, no longer available) and it provided a nice sheen with subtle glittering (very vintage) and also darkened the colors. The text is a Clippings Sticker.

Would I use this technique again? Yes, it's much easier to use a pen over a paint brush to fill-in detailed stamps like this one. I did use a permanent fixative for the isolation coat because I didn't have the "workable" kind so next time I'll try the later to see if there's a difference when it comes to applying color over the top.

I could just use markers, colored pencils, etc., but what I'm seeking is a nice white background when stamping on pre-printed paper so that the colors will pop.

A side note on Clear Rock Candy: I recently bought the dry form that comes in a jar that is sprinkled over any wet medium. I plan to do some experimenting but I'll be hard pressed to replicate the very liquid, easy-to-spread medium that you just squeezed out of the applicator bottle it originally came in.

Ranger doesn't make any of the liquid Distress Stickles any more but, believe it or not, I still have usable bottles that haven't dried out over the years like the non-Distress Stickles do. They came in squeeze bottles with a larger opening on the applicator tip and since I kept some of these empty bottles, well, stay tuned....

As always, I hope this post finds you well and happy and I appreciate your visit.

Until next time, take care.

July 26, 2020

Live Out Loud


Altering vintage photos seems to be my thing these days and each one I work on is a lesson in techniques--some that work and some that don't.

I used Photoshop to print this photo on manila cardstock after cropping it to a 6.25" x 3.125" format (the size of a #8 tag).


Then I used watered-down gesso to cover almost everything in the photo. This provides a surface that water-based inks or paints (I used watercolors) can adhere to. So, unless the tint is staining, it's easy to remove/change colors with water and tissue to erase it.

To stamp the background, I used masks cut from deli paper which is see-thru and easy to trace and cut.


I've mentioned before that I use the tip of an Xacto knife to scratch away shadows or other dark areas to make some areas read better. You can see an example of this where the woman's hair blends into the dark areas of the umbrella.


I used a Remnant Rub for the text and embellished the black line borders with dots from an orange Soufflě gel pen. I'm linking up with Simon's Monday challenge for A Day at the Beach.

As always, I hope this post finds you well and happy and I appreciate your visit.

Until next time, take care.

May 13, 2020

It's a Dog's Life


Inspired by this week's Simon Monday challenge, I'm sharing this journal page that features a trio of vintage canines (Tim Holtz Paper Dolls).

The background is the original cover page from a magazine which I hung on to because I thought it had potential.

It's tricky working with magazine papers as they tend to wrinkle and can be fragile so I use a glue called "Yes" because it doesn't buckle paper.

I used a stencil (Clarity Stamps Treescape) with some dark gray metallic paint and the birds were stamped on tissue paper before pasting down.

The paper dolls were peeled from their backing and most of the paper rubbed off to make them nice and thin which is my preference when collaging.

Both sides of the dolls were sealed with acrylic medium before assembly on the page to protect them and give them strength. I used various staining inks to tint them with a small brush.


As always, I hope this post finds you well and happy and I appreciate your visit.

Until next time, take care.

May 02, 2020

Blue Skies


Does anyone know what day it is because I am seriously starting to lose track of time.

As one day runs into another during this sequester, I'm grateful for my hobbies which have recently grown to include playing the piano--something I haven't done for a while.

I've spoken about my two great aunts, Esther and Ada, and how I inherited many of their keepsakes. Ada was a college professor with a masters in Music and I have hundreds of pieces of her sheet music including the song "Blue Skies" by Irving Berlin.

That was my inspiration for this tag made to link up with Simon's Monday challenge this week because it is not a card.


I modified the image by replacing the wings, punching holes in them and scraping away the printing to lighten spots for tinting. I used a Gelly Roll and various ink pens to modify the umbrella.


The background is an image transfer that came from an old book page, I drew circles and made dots for the border and the text was produced on a vintage typewriter.

As always, I hope this post finds you well and happy and I appreciate your visit.

Until next time, take care.

April 05, 2020

Grow


Inspired by a mood board posted at Simon's Monday Challenge blog, I've made a tag using pages/images from the Memoranda paper stash, a photo found on the net and stamped bees. The tinting came from Distress inks and a Gelly Roll pen.


The image is one of my favorites and I used it for this tag.

As always, I hope this post finds you well and happy and I appreciate your visit.
Until next time, take care.

March 15, 2020

Life is Good

(in spite of the chaos...)


I'm finally able to share something for the weekly Simon Monday challenge--A Bit O' Green. I've had a lot of false starts the last few weeks but you can't say I haven't tried☺.

This tag is nothing more than a background made with the Distress ink/oxide splat, drip, smoosh technique (Cracked Pistachio, Peeled Paint, Forest Moss, Frayed Burlap), lots of stamping with archival inks and a Remnant Rub.

I used a Gelly Roll pen for the light/white details and colored pencils to tint the stamping.


You can see in the close-up shot that I used a very fine line black pen to sharpen some of the lines and add a little more contrast.

I can either spend hours fussing with something that just won't come together or start something on a whim that makes itself in minutes--and I have little control over when this happens or why!

My, how art can mimic life (and today's current events). ☺

As always, I hope this post finds you well and happy and I appreciate your visit.

Until next time, take care.

February 10, 2020

She Loved Them All


Just four days away from Valentine's Day (and my wedding anniversary) and I still need to make cards for my hubby and my good friend (and fellow card maker) Thelma.

I guess I was warming up by making this tag and so I thought I'd share it with you today.

As always, I hope this post finds you well and happy and I appreciate your visit.

Until next time, take care. 

May 29, 2019

Perfectly Happy


I was inspired by a post at Vintage Everyday that featured wedding photos during WWII and I used one of them for this tag.

It was framed for Simon's Monday challenge this week and also features a Hero Arts stamp from 2007 called Lace Flower Cluster which I used especially for their 45th anniversary Show & Tell Celebration.


After stamping, the lace flower was cut out and embellished with lines from a white Gelly Roll pen. I altered a Tim Holtz lace frame by peeling it from its baseboard backing, trimmed its shape a little and applied dots of Liquid Pearls to the edges. The background was made with Collage Paper.

May 22, 2019

Miss Trudy


I'd sure like to know the story behind this lovely little girl but for now, I'm calling her Miss Trudy. She's a Tim Holtz Paper Doll and I stained her clothing with the ink from gel pens (scratching the darker areas a bit to lighten and texturize).

The background was stenciled (Tim Holtz Dot Fade) and I stamp embossed the border using a vintage rubber stamp (1996) by Hero Arts called Violet Border. I am featuring this stamp as part of the company's 45th anniversary Show & Tell celebration for a chance to win their monthly kits.


I am so glad I dusted it off and set about putting it to work as I'd forgotten just how useful this stamp can be!

My tag was colored with Distress Oxides, some gel pen ink and a bit of colored pencil. The bench was made out of washi tape.

I had a lot of fun with it so it's no coincidence that I chose this particular Remnant Rub for the text!


I'm linking up to the Hero Arts Show & Tell Celebration and also to Simon's Monday challenge because this week's theme is Use Stencils.

May 20, 2019

A Fortunate Find


I fussed with a tag over the weekend by altering a photo of a vintage road sign. I knew it needed something else and this morning's announcement of the stencil theme at Simon's Monday challenge gave me the ah-hah moment I needed.

I used the Tim Holtz dot fade stencil in the background but instead of dabbing ink through the holes, I swiped my ink pad over the entire surface of the stencil and then pressed it on to the tag.

May 12, 2019

Happy Mother's Day

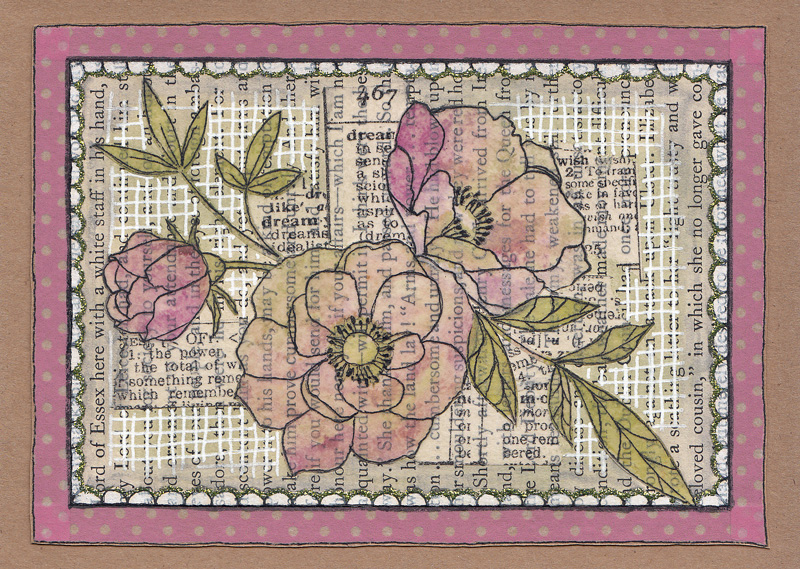
This is the card I made for my Mom this year. I am so grateful to have her still (she's a nonagenarian) and these days, our roles are reversed somewhat but more than a mom, she's my truest friend.

That's washi tape around the outside (pink polka dots), the scalloped border was hand-drawn and embellished with white paint and glitter glue.

The stamped pieces (Simon's Delicate Flower set) were cut from transparent paper that I tinted with inks and pasted onto book paper along with some more washi.


I used white and black gel pens to make lines in the background, on the borders and to further emphasize the line quality on the flowers.

I'm linking to the Monday challenge at Simon, the theme is "Add Something Metallic" and I think my glitter glue may qualify.

If you are a Mom, I hope your day is as special as you are!

April 24, 2019

Sending Hugs


I got side-tracked trying out a new stamp set from Simon called Delicate Flowers and ended up with a card I hadn't really planned on.

I'd been experimenting with coating thin papers with various mediums to use for collage. I had some rice paper, coated one side with fluid medium, let it dry and then decided to stamp it with my new set to make some masks.

After cutting the pieces out, I played around with tinting them and liked the result so I decided to use one of the flowers plus leaves on a greeting card. If you look closely, you'll see that the flower is transparent.


The background paper with the scrolls, bird, etc. is old stock from Prima called Epiphany.


I messed-up stamping the sentiment so I cut out that section, replaced it with a smaller square and re-stamped my text. A good save and one I'll remember if and when I mess-up again!


Yes, it looks handmade and it's a bit unconventional, but I'm dedicating it to all the encouraging commenters from my last post, embracing my greeting card style and learning a few tricks along the way.

April 20, 2019

Hello Friend

This card/stamping took so many tries that I almost gave up.

My artistic point-of-view takes a turn when I set about making a card. I try to be very precise so it looks "store-bought" but if it were a tag or mixed media project, I'd embrace the imperfection.

Eventually, I come around and remember that the hand-made qualities are what makes card-making superior to those that are mass-produced and machine-made. I will be bookmarking this post so I can remind myself of this point for the next time!

In this close-up, I'll point out that I stamped the image (Tim Holtz Flower Jar) on scrapbook paper using archival ink and tinted it with gel pens. For the water in the jar and the table-top, I spread the ink using a water brush (same as with the tops of the purple flowers).

The submerged stems were hand-drawn and smudged and it was tricky to get it to look right. I should have practiced on some scrap before attempting it on my card and I wouldn't have had so many do-overs (duh!).

The oval frame was machine-stitched but needed something else so I used a white Gelly Roll pen to highlight the edges.

Some of my readers know that I often use dimensional products like Scribbles or Liquid Pearls to make dots. I recently discovered a new product called Nuvo Crystal Drops (which I really like) and went kind of crazy with them here.

Mounting all of this on kraft cardstock helped convey the old-fashioned feel of the card.

I'm linking up to Simon, this week's Monday challenge is Beautiful Blooms and then I'm tossing this card in the post. 

BTW, the sentiment is from a new stamp set by Simon called Delicate Flowers. I splurged and bought the May card kit and am excited about using it.  Stay tuned!

April 12, 2019

Maurice Crooks


My Great Aunt Esther took a photo of a neighbor whose family was homesteading in Newcastle, Wyoming. She wrote his name and the date on the back--Maurice Crooks, August, 1921.

I made a copy of that photo and used gel medium to transfer the image onto a manila tag.


Then I used gesso to white-out some areas, blending the edges of the photo into the background.


Then I went about stamping and tinting and embellishing and came up with what you see here.


I know it's best not to put the focal point of a composition directly in the middle, but in this case, I threw caution to the wind since Maurice seemed to stand so proudly right in the middle of his family's meager garden.

I'm linking to Simon, the Monday challenge is "Down on the Farm."

February 13, 2019

Happy Valentine's Day


My good friend Thelma (I'm Louise) introduced me to card-making and it's understood that the cards we exchange between ourselves can be an outside-the-box/anything goes kind of flavor. Because there are no rules it makes our tradition that much more fun.

This is the card she will receive tomorrow, made from an assortment of papers (mostly Authentique) including one called "Stitches Two" which is the band running through the center.

The card also includes a hand-colored printable (background heart border) that I distressed and embellished with dots of Scribbles (3D fabric paint). I used an assortment of gel pens for the coloring.


I have a very limited stash of sentiment stamps so this one was taken from an example found on the net. My technique is to print the example, rub a thick coating of graphite (pencil lead) on the back, tape it down with washi and trace over the top of it. This transfers most of the outline of the lettering and then I go back over it with a fine-tipped marker. The heart trio was stamped.

January 15, 2019

The First Dream

I am so grateful to be in the studio again and to have something to share with you today. Other responsibilities can rob me of the time I'd like to spend creating and then sometimes I just can't muster-up the motivation.

But whatever keeps me away makes the return that much sweeter!

I used this week's prompt at Simon's Monday Challenge Blog--Recycle Something--to create a tag and nothing emphasizes recycling more than collage.

We save our bits of scraps because they might be perfect in a future project and just shuffling through them can be cause for inspiration. The happenstance is perhaps what I like best about working in this medium.


Using layers of thin papers to build this tag, I embellished it with a Japanese Haiku poem that is fitting for my first tag of the new year.

The Japanese attach special significance to the first of many things they do in a new year. Some traditional firsts that are notable are kakizome (first writing), hatsuyume (first dream), hatsumōde (first shrine visit), hakizome (first house cleaning), and hatsuburo (first bath).

the first dream of the year —
I keep it a secret
and smile to myself

–  Sho-u

from The British Museum Haiku, translation by R. H. Blyth

Regarding technique, I have once again reinforced the fact that I am clearly "embossing impaired" especially when it comes to white on collage mediums. I need to figure out what the problem is by spending time experimenting. I just gave up here and used a gelly roll pen as a substitute.

UPDATE (1/19/2019):

I am happy to report that the error of my ways regarding white embossing has been resolved. After some experimenting, I discovered that I must use white powder instead of clear powder (ink color doesn't matter). I always reached for clear powder (using white ink) so I didn't have to worry about stray bits but now I know I can't have it both ways. Lesson learned.

December 18, 2018

12 Tags for Christmas 2018 - No. 10 & 11


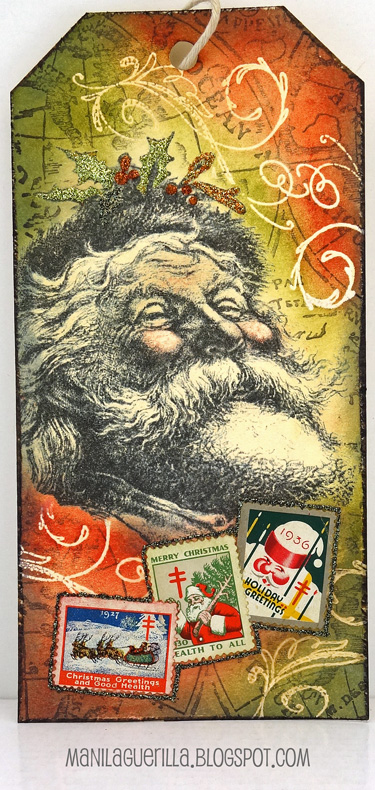
I'm still looking back to Christmas tags from the past and I've saved some of my very favorite tags for when we get closer to Christmas. This is one of them.

The background is made from mulberry papers and the tree was hand-cut out of kraft paper that had been randomly stamped and embossed to create texture. I added the tinsel using glitter glue and a white gel pen.

The text was cut from a recycled store-bought Christmas card and illustrates just how far I will go when it comes to fussy-cutting. Crazy I know but I loved the style of the lettering and I was several years away from owning a die-cut machine.  Since the text was wider than the tag, I just let it bow out when I attached it to the bottom of the tag.


This one's a favorite because of the Thomas Nast Santa (an image transfer). It's an early example of learning how to blend Distress inks, how to emboss (the white scrolls) and how to use masks when stamping.

If you don't recognize the kind of stamps I used at the bottom of the tag they are called Christmas Seals. I inherited a small collection from my Great Aunt Esther, they're a terrific embellishment--I must remember to use them more often!

October 06, 2018

Elegant Mind


Just another tag for this week's theme at Simon's Monday challenge with no new ideas or techniques to impart. Only a reminder to do what you love, create with abandon and embrace the escape it provides.

September 29, 2018

Simply Discover


You'd think working in monochrome would be easy--yes? I have found it to be easier said than done.

And so, for this week's linkup to Simon's Monday challenge, I took the easy way out and went with a black and white theme.

It started with a background paper (Paper Studio B/W Abstract), layered under a page trimmed for the base from Prima called Epiphany.

The luna moth was printed from some clip art then cut-out and pasted and embellished with gray paint and black and white pens (Sakura gelly rolls and Pitt big brushes).

There's a little washi tape, some Remnant Rubs, and a stamp from a set by Tim Holtz called Stamp Collector.

One of my favorite tools used for the black shading around the moth is a Derwent Sketching pencil--Dark Wash 8B.