/* */ Beulah Bee: designer spotlight
Showing posts with label designer spotlight. Show all posts

December 05, 2022

No. 5 for Christmas, 2022

I inherited multiple copies of professional portrait photographs of my great aunts and their relatives/friends (circa 1900-1940) mounted inside thick, tri-fold paper folders. Since I don't need to save, for example, ten copies of a graduation portrait of the same person, I recycle the folders to use in my artwork. That's what makes up the foundations for this tag.

It features a die-cut pattern of poinsettias (Tim Holtz) that were filled-in with Stickles along with a Christmas Collage Paper covering. I used a laser-printed vintage photo mounted inside an old Idea-ology sticker frame antiqued with paint and Liquid Pearls. The numerals were cut from scrapbook paper and covered with Stickles.

I'll share a tip for anyone who doesn't like the unavoidable shedding of glitter--just cover it with a layer of clear medium to seal it. And if you use a matt finish it creates a more subtle, vintage appearance.

I'm linking this one up to Simon's Monday challenge, this week's theme is Holiday Cheer.

As always, I hope this post finds you well and happy and I appreciate your visit.

Until next time, take care.

May 13, 2020

It's a Dog's Life


Inspired by this week's Simon Monday challenge, I'm sharing this journal page that features a trio of vintage canines (Tim Holtz Paper Dolls).

The background is the original cover page from a magazine which I hung on to because I thought it had potential.

It's tricky working with magazine papers as they tend to wrinkle and can be fragile so I use a glue called "Yes" because it doesn't buckle paper.

I used a stencil (Clarity Stamps Treescape) with some dark gray metallic paint and the birds were stamped on tissue paper before pasting down.

The paper dolls were peeled from their backing and most of the paper rubbed off to make them nice and thin which is my preference when collaging.

Both sides of the dolls were sealed with acrylic medium before assembly on the page to protect them and give them strength. I used various staining inks to tint them with a small brush.


As always, I hope this post finds you well and happy and I appreciate your visit.

Until next time, take care.

August 16, 2019

Summer


I'm celebrating summer with this project, prompted by two blog challenges: Simon's Midsummer Blues and Frilly Funkie Junkie's Let's Do It Again. The blue part is self-explanatory and doing it again meant revisiting an old project and creating a remake.

You may know that I do love fussy-cutting and especially the flowers from the Tim Holtz Wallflower paper stash. So that, along with a Baseboard Doll and Lace Baseboard Frame, was what I used to assemble this project.

It was mounted inside the back of a wooden panel that I covered with paper. The doll's left arm was originally bent up high and was altered by slicing and dicing and piecing together some baseboard from another doll.


Here's the original project that inspired the "do-over." It is a Configurations Box I made for CHA 2015. Paper dolls hadn't been invented yet so I cut the girls from a Found Relative photo. It was the year the Wallflower paper stash came out and I assembled a garden for them to sit in.


So, it is still mid-summer here in the desert and we'll have at least two and a half more months of high temps. There hasn't been any monsoons that bring rain so the dry spell weather-wise coincides with my own personal artistic dry spell and lack of posts. I'm thankful for the prompts this week and it feels so good to be working again!

Update: So proud this post became a Top Pick on the TFJB blog--thank you!

April 12, 2019

Maurice Crooks


My Great Aunt Esther took a photo of a neighbor whose family was homesteading in Newcastle, Wyoming. She wrote his name and the date on the back--Maurice Crooks, August, 1921.

I made a copy of that photo and used gel medium to transfer the image onto a manila tag.


Then I used gesso to white-out some areas, blending the edges of the photo into the background.


Then I went about stamping and tinting and embellishing and came up with what you see here.


I know it's best not to put the focal point of a composition directly in the middle, but in this case, I threw caution to the wind since Maurice seemed to stand so proudly right in the middle of his family's meager garden.

I'm linking to Simon, the Monday challenge is "Down on the Farm."

February 01, 2019

Love Always


Tim Holtz (Idea-ology) came out with a new product this year called Baseboard Dolls and I received some of them to use on projects for the Creativation booth. The little girl on this tag was a Baseboard Doll that I converted to a regular one by peeling her off the substrate.
She sports one of Tim's new Transparent Wings and I used a flower from the previous version of Botanical Layers that also comes on sturdy paper which I peeled off to make more suitable for collage.

The background was part of the instructions from a needlework pattern that I tinted with Distress Ink.


I dabbed on a very small amount of alcohol ink to tint the wings (originally clear) with a combo of Butterscotch and Watermelon and some hand-sanitizer to help dilute it and spread it around.

They were attached with a drop of epoxy in the center of the girl's back and the remainder of the wing surface moves freely.

Click to Enlarge

For the first time, I also used a product call Nuvo Crystal Drops (Olive Branch) to make dots along the tag border.  Some of you probably know how much I like to use Scribbles (a 3D fabric paint) or Liquid Pearls to create a similar effect but that paint is opaque and this product is transparent, behaves like a tinted version of Glossy Accents, and I like it a lot!

I'm linking up to Simon's Monday Challenge Blog--this week's theme is Love is in the Air.

November 23, 2018

12 Tags for Christmas 2018 - No. 3


I've used another Penny Black stamp called Tree of Holly for this tag and I'm linking to their Creative Christmas Challenge and also to Simon's Monday Challenge for the "Let It Snow" theme.

I used embossing ink and silver powder for stamping then filled in the tree with the juiciest, most powerful purple in my arsenal of crafting supplies--Seedless Preserves Distress Stain.

I filled in the holly and berries with paint and glitter, added more bling to the border and placed a Christmas Remnant Rub from a few years back along the bottom.

The snow was made with texture paste and a stencil by Simon Says Stamp called Falling Snow.


To see more of my Christmas tags you can click on the label at the bottom of this post or use the link I've placed in the sidebar.

September 09, 2018

One of a Kind


Have you ever wondered what it would look like to stamp several Tiny Things* with archival ink on hot press watercolor paper cut in the shape of a tag then filled in with colored pencils in rainbow fashion?

Me, too! I'm linking to Simon, the Monday challenge is "Stamp on it."

*Stamps by Tim Holtz (except for ant).

June 24, 2018

Penny Farthing


A journal page to share with you today made for Simon's Monday challenge--this week's theme is "Transport It." It was a chance to embrace my passion for collage and to try out a new addition to my craft stash--Idea-ology Plain Collage Paper (Tim Holtz).


Over the years, I have amassed a sizeable collection of images taken from old picture books (no worries--they were destined for the trash) and it was a pleasure to find the material I used for the background.

I also used an image from the net that was fussy cut and pasted over the top. The foreground paper is from Tim's French Industrial paper stash. The text is a Tim Holtz Clippings Sticker.

The Plain Collage Paper was used to stamp the typewriter keys (Tim Holtz Documented) and also the postage stamp (Hampton Art 2010).


Here's a close-up view and you can see how transparent this collage paper can be. I find it superior to other tissue papers I have used in the past and know I will get a lot of use out of it. There are also printed versions with flowers, birds, and script.

In case you are wondering, a penny farthing is a high-wheeled bike and I suspect the driver of the motorcycle with sidecar may have been the photographer.

That's the Hammersmith Bridge, London in 1900. The city skyline is Florence, Italy, and the postage stamp and the stamped script (Inkadinkado) are French. Now that's traveling!

May 05, 2018

Moments in Time


Time. Oh what a topic and such a precious commodity! It's the theme at Simon this week and here's what I made.

Crafted from some Idea-ology bits (pocket watch, flowers) and the new Worn Wallpaper, it was assembled with a homemade box and basswood strips. The support for the pocket watch is a small wooden tag turned upside down.


A vintage image was placed under the dome of the watch and I embellished it with a ball chain. The quote is an image transfer.

March 14, 2018

Limited Edition


Inspired by a mood board for Simon's Monday challenge this week, I have created a tag that is a very literal translation. But I just couldn't help myself as something about a cracked egg as a vase for flowers resting inside a tea cup really spoke to me.

I didn't have a tea cup stamp so I printed an image of one and the flowers were cut from the Wallflower paper stash. The background stamp is by Heidi Swapp, the tinting is Walnut Stain Distress Oxide and regular Distress Bundled Sage (on watercolor paper) and the text is a Remnant Rub.

January 25, 2018

Find Away

I like challenge blogs and my favorite is the Simon Says Stamp's Monday Challenge Blog. And I really, really like challenge blogs when the theme is to create a tag or something with a tag attached.

As I am rather fond of the format :) for this week's Tag It challenge, I used both suggestions and made a tag with tags.


Tim's tiny stamps, washi, tissue wrap, remnant rubs, found relatives and fabric bits were used to create my, dare I say? unconventional masterpiece. No matter what you might think of this tag--you gotta love that faucet (so much detail in such a tiny stamp)!

November 21, 2017

Christmas Snow


I love this tag. And it was EASY to make. Perhaps this post will inspire you to give the technique a try?

Prompted by Simon's Monday Challenge Blog, where this week's theme is torn paper, I began to search for inspiration on the web and kept seeing cupcakes like this one by artist Nancy Standlee.

Her post made me realize that an easy way to start a torn collage is by using an underpainting as a pattern you can follow for matching shapes and colors.

So, using this image as my guide, I tinted several pieces of vintage book paper with red, dark blue-greens, and brownish grays and set out tearing and pasting my pieces down.


The paper on the snowman's face and body is untinted--it is the actual color of this really old paper and the darker areas are the page edges where most of the discoloration occurs.

His hat accoutrements were cut from Tim Holtz ephemera and of course there's lots of Stickles. I also covered the eyes, nose and buttons with Glossy Accents and I'm glad I did.

Making this tag put me in the spirit and now I'm now ready to tackle the job of setting up the Christmas tree!

October 26, 2017

Monochrome


A manila tag, a Halloween stamp set from last year (Tim Holtz), a vintage photo (reduced), Distress Oxide Walnut Stain and Versafine Onyx Black inks were used to create a monochromatic scheme as prompted by Simon's Monday Challenge Blog this week.

I found this to be quite challenging to make. First, I'm still getting used to the oxide ink used for the background's first layer. Then it took several stamping attempts to manage an arrangement of the single house stamp into the fortress you see before you. The Versafine ink is the best for bringing out the details of this really terrific stamp.

A poison label stamp (also from the set) was used for the base of the tag and I varied the degree of shading with a light wash of transparent black and even some diagonal scratching to create more depth and delineation between the two foreground planes.


The ladies came from a terrific vintage photo (source: Vintage Everyday) that I reduced in size before printing. Granted, the scale isn't accurate but I didn't want to lose too many details by making them super small.

I have to say working with a monochrome theme wasn't easy and creating a balance of light and darks in the same color meant thinking outside the box. But, I always appreciate the Monday Challenge prompts as I end up trying things I wouldn't have otherwise--so thank you, Simon!

October 19, 2017

Best in Show


Most collage artists have a habit of collecting images that might be useful for a future project. I like to collect people and the image I used here was found and saved to my stash six years ago.

I thought the spotted theme clever but had no way of knowing when I'd use it--until now.

This week's theme at Simon's Monday Challenge Blog is "Man's Best Friend" and became the perfect opportunity to use it.

The background is a page from the Tim Holtz Etcetera paper stash, an 8" x 8" collection of papers that are sized just right for tags.

I added polka dots using Tim's Dots & Floral stamp set, the label is from one of his Ephemera collections and most of the tinting was done with colored pencils.

September 10, 2017

Beyond Measure


Mother Nature is reminding us, once again, how important family and friends are and that we must watch out for one another especially during the hard times.


The tag was made with Sideshow stamp, Chatter design tape, Distress Oxide inks, and Correspondence paper stash.

I'm linking to the Monday challenge blog at Simon Says Stamp where they are celebrating Stamptember and this week's theme is Stamp It.

April 05, 2017

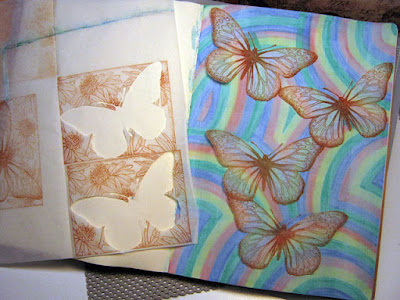
Blue Butterflies


Ready?


Rainbow stripes drawn with watercolor brushes (Dollar Store)
then covered with light gesso wash.


Butterflies stamped on deli paper with sepia archival ink and cut out.


Butterflies pasted to page using glue stick.


Butterfly wings filled-in with blue watercolor brush
and outlined with black gelly roll pen.

Butterfly outlines traced onto Postale tissue wrap and cut out.


Tissue wrap pasted around butterflies using fluid medium.


Blossom stencil and white paint used to fill-in around the page.


Blossoms tinted in random areas with Distress ink.

I'm linking this journal page to Simon's Monday challenge blog.

Who knew rainbows could be so inspiring?! 

March 30, 2017

No Reminders


Good to be back posting and SO grateful that more time is trickling in to spend crafting. Being away for awhile, it felt curiously awkward to start in again (some of my paints had even begun to dry).

I used this week's theme (Things With Wings) from the Monday challenge blog at Simon Says Stamp as inspiration for my tag.

I collaged two photos (a butterfly and a ballerina) on a background made with paper from the Idea-ology Etcetera stash.


I've used the butterfly before (see here), it's called a Luna Moth and I just love it's long, drippy wing span. I added a phrase from the Idea-ology Clippings Stickers which describes perfectly how I've been feeling lately.


I enhanced the values with colored pencils and Distress ink.

I'm also sending a Happy Birthday (No. 3) wish to A Vintage Journey where they are celebrating "Tag Friday" with a special gift and link-up.

October 29, 2016

Field Notes


Autumn means a second spring here in Phoenix. After the long, dry summer (when plants are in survival-only mode), cooler temps give them an opportunity for another growth spurt before winter sets in.

Trees don't turn colors or lose their leaves but seed pods, so common among many desert-adapted trees, have dried out and begin to fall.

So, when this week's theme at Simon's Monday Challenge Blog was Autumn, I thought to pick up an empty pod on an evening stroll and made a paint box out of it. Crazy? Yes, but you have to admit it's original!

October 05, 2016

Triplets


Identical triplets are extremely rare and so, I suppose, are purple tree trunks. But who cares--anything goes on Halloween, right?

I stamped and embossed the trees (Inkadinkado) to create a resist for the Distress ink sky then ironed off the embossing (see my tutorial here). The moon was made with a mask. The text was stamped (Tim's Mini Halloween #5).

I wanted the house (also Mini Halloween) flipped from right to left so I stamped it on Plain Tissue Wrap, turned it over, painted the backside off-white, cut it out and pasted the painted side down. You lose some of the crisp image with this method but I think the softer, lighter look works here.

I needed something in the foreground so more tissue wrap was used, this time stamped with a crackle image in brown archival ink and tinted with distress.

I cropped Tim's Gothic Gate thinlet die to fit my tag (and support the composition) then darkened the gray paper with black Distress.


The triplets were laser-printed in a very small size, cut-out and pasted down. Do they remind you of that hallway scene in the movie The Shining? I guess that's the look I was going for. Anyhow, some shadows were added and I decided to mount the tag on black paper and add some dots of Stickles around the edge.

I'm linking this to Simon's Monday Challenge blog where this week's theme is Halloween.