/* */ Beulah Bee: Tim's 12 tags
Showing posts with label Tim's 12 tags. Show all posts

December 31, 2016

12 Tags for Christmas - December


I didn't mean to wait so long to complete my final tag of this series and link it to Tim's December post but it's been a busy month.

Each day I would pass by the bulletin board in my bedroom/studio and see the blank spot meant for this month's tag. I considered skipping it but that just wouldn't sit right with me--my track record for completing the monthly tags will not be broken!

So on the last day of the month, last day of the year and at the very last minute, here's number 12.


Happy New Year!

November 16, 2016

Abraham


A mixed-media menagerie is what Tim had in mind for this month's tag using a rub resist technique with dimensional coloring and this is what his post inspired me to create.

I lightly tinted a vintage tag (used for tracking sewing alterations) with shades of fall colors and applied Gilded Alpha remnant rubs and a bit of stenciling.

The photo is an image transfer that I framed with tiny dots of black Scribbles (a 3D fabric paint).


I cut and pasted Abraham's initials from a text stamp and the owl stamp was hand-carved by yours truly. The Adornment Arrow was tinted with Butterscotch alcohol ink to match the gold of the remnant rubs and I used some Small Talk stickers that were a perfect match for the photo.

October 10, 2016

Science Guy


Made to link-up with Tim's 12 Tags for 2016, this is the 41st tag I've made for the year not counting all the boo-boo's that ended up in the trash (Halloween pun intended).

It's a little plain Jane, especially for Halloween, but I lean towards "less is more" (perhaps just an excuse for not knowing what to do next). However this time, I did summon the courage to add some tiny black splatters and for me that's a step in the right direction.


Tim's technique started with a collage background of paper bits then a covering of crackle medium. I discovered first-hand that a thin application yields tiny cracks (background) and laying it down thick on the frame/tag borders (I used a fine-tip squeeze bottle) changed the look completely.

(Click on photos for a larger view.)


Obviously, my "Science Guy" isn't one of Tim's metallic monster masks but you have to admit this photo is just as bizarre. We can only assume this gent may have been a little impoverished (note the clever way he's buttoned his jacket) and I have no idea what he's cooking but it looks a bit suspect to me.


I used the skull from Tim's Mini Halloween Set #5 and also one of his Vellum Ephemera pieces painted off-white on the back and then distressed by sanding, wrinkling and inking.

To fill in the empty spaces, I mixed some texture medium with paint to match the shade of the medicine label and applied it through Tim's Dot Fade stencil before splattering the tag with watered-down black paint.

October 05, 2016

Triplets


Identical triplets are extremely rare and so, I suppose, are purple tree trunks. But who cares--anything goes on Halloween, right?

I stamped and embossed the trees (Inkadinkado) to create a resist for the Distress ink sky then ironed off the embossing (see my tutorial here). The moon was made with a mask. The text was stamped (Tim's Mini Halloween #5).

I wanted the house (also Mini Halloween) flipped from right to left so I stamped it on Plain Tissue Wrap, turned it over, painted the backside off-white, cut it out and pasted the painted side down. You lose some of the crisp image with this method but I think the softer, lighter look works here.

I needed something in the foreground so more tissue wrap was used, this time stamped with a crackle image in brown archival ink and tinted with distress.

I cropped Tim's Gothic Gate thinlet die to fit my tag (and support the composition) then darkened the gray paper with black Distress.


The triplets were laser-printed in a very small size, cut-out and pasted down. Do they remind you of that hallway scene in the movie The Shining? I guess that's the look I was going for. Anyhow, some shadows were added and I decided to mount the tag on black paper and add some dots of Stickles around the edge.

I'm linking this to Simon's Monday Challenge blog where this week's theme is Halloween.

September 07, 2016

Ripper Street


My husband said this Found Relative photo reminds him of the Victorian era detective drama called Ripper Street that he enjoys watching hence the name of my post/tag. One of the main characters wears a Bolo hat so I suspect that's his reason for this connection.

It's my entry for Tim's September tag challenge where he introduced an archival/alcohol ink resist on Yupo. The background text in the close-up above was made using this technique with his Ledger Script stamp.

I've always wanted an easy way to make light text on a dark background and this is a great way to do it--thanks, Tim!


I began by cropping and distressing a Sophisticate cabinet card that I delaminated and pasted to a manila tag. The Found Relative (also delaminated) was cut-out and pasted to the Yupo and then cropped into an oval for mounting on the cabinet card tag.

I used copper and black Scribbles around the oval to create a pseudo-frame along with some Idea-ology ephemera (Thrift Shop) and paper strips (cigar box labels) cut from the Dapper paper stash.


The star was made by altering an Idea-ology Fastener by picking out the original image, painting in the center, applying a Remnant Rub and tinting/distressing the metal edges.


If you're on the fence about adding Yupo to your stash let me say I highly recommend it. It's great for mixed media and I've used it extensively for creating my own stencils because it's thin, easy to cut and very, very durable (see my post here).

In my opinion, the only shortcoming is that since it's actually a plastic you have to use caution with heat guns.

August 18, 2016

Receipt No. 25


I really like the look of sewing on paper. One artist whose work I greatly admire, Viv (aka Hens Teeth) in Staffordshire, embroiders on vintage envelopes and they are just divine. You can see them here. Her studio is pretty fantastic, too.

Tim Holtz also seems drawn to the look of stitching as several of his monthly tags have featured this technique so it's no surprise that my August tag for the 12 Tags of 2016 has some too.

A Mixed Media Thinlit die-cut, Wallflower paper stash cut-outs (including vellum), some Small Talk stickers and Remnant Rubs were used to complete it.

I wish I'd splattered some flecks of paint here and there as I think it would have been a nice addition. I just didn't have the guts and so I need to work on that.

July 22, 2016

Snapshot


Behold my most favorite Tim Holtz stamp (Memoirs). It's a bit tricky to get a good impression but once mastered, I think the rewards are massive. I'll never tire of using it and I'm delighted to share it with you today (this image is also my favorite Found Relatives photo).

I've used it for this month's 12 Tags of 2016, though I've strayed a great deal from his watercolor resist and word layer techniques. Still, his post inspired me and this is the result.


The manila tag support and ephemera already had a vintage tint so I only used a few Distress stain colors--primarily Tea Dye and Bundled Sage with just a touch of Victorian Velvet thrown into the mix. To create more depth in the stamped image, I used an Indigo colored pencil in the background.

The ephemera frame is actually a windowed envelope that contained souvenir photos like this example.


The butterflies were stamped onto Tim's Plain Tissue Wrap then cut-out and pasted on. I also used words from a Remnant Rub and machine stitched along the tag edges.

June 08, 2016

Enigma


--------------------------------------------------------------------------------
Enigma
noun  [enig·ma \i-ˈnig-mÉ™, e-\]
: someone or something that is difficult to understand or explain
--------------------------------------------------------------------------------

Decidedly more funky than frilly, here's my tag for this month's Tim Holtz 12 Tags of 2016. I used his Sideshow stamp set. While the technique remix features stamping on fabric, die-cuts and tissue paper, only the later was used for this project.

You'll find the tissue in the lower and upper right-hand corners--it's stamped with text. I didn't wrinkle it like Tim did so you can't really tell where it is but that's why it's useful in collage pieces (because it blends in so well).

May 04, 2016

May Remix


Let me introduce a tag made with all "Tim" products as inspired by this month's 12 Tags of 2016 (minus the tattered florals) where his remix features a Tissue Tape resist technique.

In the end, mine is more about enhancing the flower blossoms that are so much fun to paint. To quote Tim, "...stay true to your style throughout the creative process."  So I did and the sentiment was chosen to reinforce his statement.


The stamp is from the Flower Garden set, the bee is from Tiny Things. The Bubble stencil, Lace Trimmings (sewn on with gold metallic ribbon) and Small Talk stickers helped to embellish and I used the same tissue tape as Tim which is called Symphony.


And I used watercolor paper cut into the shape of a tag instead of one made with traditional manila cardstock.

Tim's tape is, without a doubt, my favorite kind because it's translucent, tough, and stays stuck! Just a little piece of it here and there in a composition can add just the right effect.

This month's tag made me appreciate it that much more.

April 20, 2016

Travel Time


Gambel's Quail are everywhere in my neighborhood and in great numbers, too. They travel in groups, chatter a lot, and almost never fly preferring instead, to scurry along the ground very quickly.

That was my bird of choice for Tim's 12 Tags - April and my mosaic technique was to paste paper bits from the Destinations Paper Stash on a bird illustration/drawing cut from an old book. I filled-in the cracks with white paint and covered the pieces with Glossy Accents.


If you live in metro Phoenix, you might recognize the Express Bus Pass which depicts another unique feature of our landscape, the Saguaro Cactus. The background paper (purple photo of mud cracks) was a yard sale find.

I used some Remnant Rubs, Postale Tissue Wrap and black Scribbles as embellishments along with machine stitching around the edges.


I always have so darn much fun working on Tim's monthly tags--his technique driven prompts have me trying new things that I wouldn't normally think of. This month's tag really emphasizes that point.

March 07, 2016

Simplicity


Tim's March tag inspired me to "remix" a layer of cardboard along with texture paste and paint splatters.


I used a stencil called Mini-Tatting by Rebekah Meier (TCW), Tim's Chit-Chat stickers and his new Ledger Script stamp (buried underneath the layers), along with some butterflies cut from Graphic 45 paper (Botanicabella).

Since the butterfly antennae are impossible to cut because they're so tiny I clipped a few strands from a black paintbrush and pasted them on instead.

February 11, 2016

Mildred & Maurice


Love is in the air with Valentine's Day just around the corner so imagine a long-distance romance between pen pals, Mildred and Maurice, who made plans to meet at Le Grand Hotel in Monte Carlo.

My inspiration for this creation came from Tim's February tag and features images from his Photo Booth collection.


I distressed the photos and scratched over the surface to create some texture and design. That, along with a variety of paper ephemera helped to complete their story.


The background technique is worth mentioning as I really like the result. Made by covering black cardboard with sewing pattern tissue paper, it gives off a vintage tone which seems perfect for this ensemble.

January 13, 2016

Remix


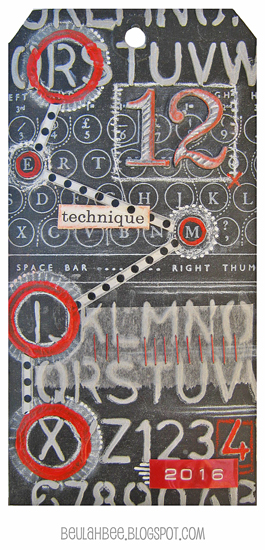
Tim's doing a "Technique Remix" for the 12 Tags of 2016 and this month he features metal embossing and chalkboard stamping. What a combination!

So even though I really tried to use more metal (three tags are in the trash as I write this), the best I could do was pull off the chalkboard look. In spite of my failures it was great fun just to try.

I thought I'd share my discovery for making your own chalkboard paper. Either start with black paper or make your own with paint or black gesso then coat it with what's known as clear gesso.

It's meant to be used mostly for pastel artists who need "tooth" on their surface for the powdery pastels to cling to. It's basically clear acrylic medium with a bit of fine sand mixed in.


First I used Tim's Schoolhouse stencil on a black tag to apply texture paste that was tinted with gray paint. I let it dry, stamped with Tim's Type Keyboard using white pigment ink and clear embossed it.

Then I applied the clear gesso over everything so I could use a white charcoal pencil to give it that chalkboard look.

Remember the grungeboard die-cuts from Tim's early days? That's what I used for the big number 12. Painted with black and clear gesso, they were easy to tint with a red pastel pencil and more white charcoal to keep the chalkboard theme going.

Some circles stamped with red paint, a bit of washi (polka dots), tissue paper and two more design features from Tim's early beginnings--mini staples and Dymo tape (the red 2016) provided the final embellishments.


I may have drifted from this month's remix but embraced what I've learned from following Tim's tag tutorials for such a long time and am excited about this year's new twist. I think it will be great fun to revisit these oldies but goodies.

November 06, 2015

Braves

Click to Enlarge
Even though it's made entirely of Tim Holtz products, my entry for this year's November tag departs a great deal from Tim's inspiration piece.

At least it has an Autumn/Thanksgiving-ish theme?

All I know is I wanted to use the photo from the Occasions Found Relatives of children dressed up as Indian braves.

You may recognize the feather from the Wallflower paper stash which I embossed with a stylus to bring out the individual feather strands.

The nest/eggs background piece is also from Wallflower which I delaminated a bit by sanding the back to get it as thin as possible.


The background is a textured page from the Destinations paper stash and I added a few more darks with Distress Ink (like the shadows at the boys' feet). I topped it off with some machine stitching and Remnant Rubs and called it complete.

October 08, 2015

Tricksters


My take on Tim's tag #10 for 2015 includes a found relative photo from the Occasions set and features children in some pretty terrific Halloween costumes.

The photo's orientation is landscape so it was cut in half and layered to fit on my tag.

The creepy castle was cut from a page in Tim's Destinations paper stash and the moon behind trees is a scrapbook page found at a garage sale (maker unknown).

I trimmed it with green, purple and black Stickles and the letters were cut from Tim's big chit-chat stickers.

Click to Enlarge

Click to Enlarge


As near as I can tell, there are 13 children in this photo and starting with the back-row (from left to right) there's a ghost, a kid with a mask that has Mickey Mouse type ears, a fancy lady, a cat, a witch, a colonel, a skeleton, a pumpkin ghoul, a scarecrow, a nurse, Little Bo Peep, and a couple of clowns.

What a priceless moment in time and what fun they must have had!

September 04, 2015

Remnants

rem·nant
/ˈremnənt/

noun

a small remaining quantity of something.

a piece of cloth or carpeting left when the greater part has been used or sold.

a surviving trace.


I only have remnants of brain matter left this month after working on my entry for Tim's September tag--it was a challenge!


To begin with, I'm alcohol-ink impaired so piles of glossy stamping paper later, I finally arrived at a background that might work.

I don't have transparent gloss texture paste so I used gloss gel medium with Tim's Scribbles stencil instead. I thought it would dry clear but I believe the thicker application prevented this. It's still somewhat transparent though and the pop of alcohol ink colors shine through but it's obviously not the same effect as Tim's.

Rather than highlight the texture with archival ink I used Vintage Photo Distress stain to darken the cracks and provide some contrast.

Click to Enlarge

There's no frosted paper in my studio so I took a laser printer transparency and sanded both sides to mimic this product. I guess it's close-enough but didn't curl as easy as his did.

Finishing touches included a Foliage charm, Remant Rubs (Words), ribbon scraps and Scribbles (3D fabric paint) dotted along the tag edges.

Tim's monthly tags always challenge me and this time, after allowing myself to fail (and learn), I thankfully pushed myself through.

I am grateful for the process and the end result!

August 08, 2015

B Original


Tim's tag for August features a die-cut mixed media background.

I attempted to mimic the effect by using his Subway stamp over a scrap from the Destinations paper stash.

I also used his vellum Ephemera--the square in the upper-right corner and the checkered board behind the photo (which is a Found Relative that I cropped and altered just a bit).

Click to Enlarge

Remnant Rubs provided the black text (except the "B") and the Mirrored Star was distressed with a copper and citris alcohol ink combo.

The oval frame is a thin textured metal scrap that I tacked to the tag with hand-stitching.


A bit of machine stitching, some stamping here and there for texture (tiny black squares and splotches) and black ink to distress the tag edges finished it off.

July 04, 2015

The Fourth


Tim's July tag celebrates Independence Day and what better way to spend the holiday than to play along? I haven't any blue print stamps but except for the postage stamp and typed text, everything else here is Idea-ology.

The boys are from the Occasions photo pack, the red papers are from the Merriment paper stash, the blue is from Correspondence and the snippet of the word "July" came from Lost and Found.


The "Credo" stamp is a US commemorative from 1960 which depicts a quote from Francis Scott Key:

And this be our Motto, in GOD is our TRUST.

"Life, Liberty and the pursuit of Happiness" are words from the Declaration of Independence and our reason for celebrating today. 

Happy 4th of July!