/* */ Beulah Bee: Scribbles
Showing posts with label Scribbles. Show all posts

December 17, 2022

No. 8 for Christmas, 2022

I wanted to make a Christmas tag inspired by a favorite artist, Wendy Addison, who puts on a special sale/show every year at Christmas. She uses paper rosettes in a lot of her work and that was my starting point along with a plan to use lots of glitter. ☺

I used vintage book paper and ephemera along with die-cut pieces (Carta Bella) covered with silver Stickles and dots made with off-white Scribbles.

I'm linking up to Simon's Monday challenge for this week's "Tag" theme.

As always, I hope this post finds you well and happy and I appreciate your visit.

Until next time, take care.

April 17, 2022

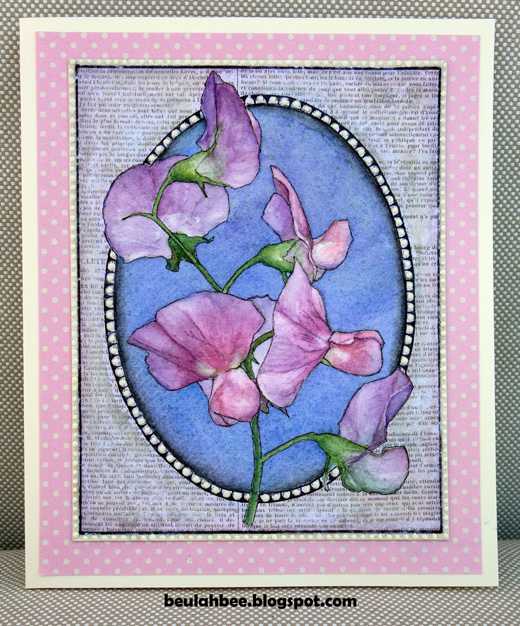
Sweet Pea

Greeting Card

I traced an image of a Sweet Pea then used watercolor for tint, created a background mask from scrapbook paper and used a fine line marker to create the frame borders.

To create the mask, I used deli paper to trace an outline of the oval and flower parts then inserted the tracing on top of the scrap paper for cutting.

For better emphasis, I later outlined the watercolor drawing. Maybe I am so used to stamped images that the no-line effect just didn't seem right to me.

I used dimensional dots for accent (Scribbles) and I left off any text so that I can customize the card when I'm ready to gift it.

I'm linking up to the Sweet Treat challenge at Simon.

As always, I hope this post finds you well and happy and I appreciate your visit.

Until next time, take care.
October 24, 2021

Strange Rumors

An image transfer, book text/paper, postal scraps, along with paper and rub-ons from Tim Holtz are the ingredients used to make this piece. I've also used Simon's dot stencil with texture paste, Scribbles (3D-paint) and inks for tinting. And I've completed it just in time to link-up with Simon's Halloween challenge!

As always, I hope this post finds you well and happy and I appreciate your visit.

Until next time, take care.


September 05, 2021

Glimmersmitz

greeting card

A head start on Christmas cards? Maybe. But a call to create with "glimmer and sparkle" at the Simon Monday challenge was really the push for making this one. What's Christmas without some shiny bits--am I right?

I used Pink ombré paper (Martha Stewart) covered with Tissue Wrap (Holtz) trimmed to fit around Poinsetta Pieces die-cuts (Holtz) that were cut from a bronze metallic envelope.

Copper Liquid Pearls, some Stickles, and white Scribbles provided the glitz. I heat embossed the white text and outlined one side of the letters with an extra-fine black marker to create a 3D effect.

greeting card

As always, I hope this post finds you well and happy and I appreciate your visit.

Until next time, take care.

April 11, 2021

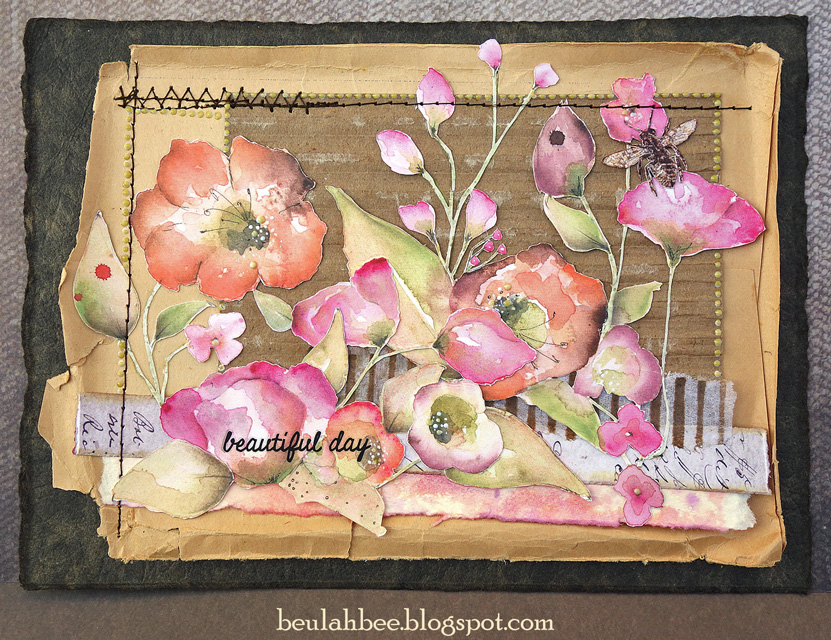
Beautiful Day

Greeting Card

Sharing an unconventional greeting card today--its support is a small vintage portrait folder with layers of papers--prompted by Simon's Monday challenge.

The flowers were fussy-cut from a paper pack called "Let Your Soul Bloom" (Moda Scrap 2019) grounded by strips of scrap paper, some delaminated cardboard and the backside of a really old envelope.

A bit of machine stitching and Nuvo Crystal Drops along with a Remnant Rub were used as embellishment.

As you can imagine, pasting all of this would have been a chore but I used a spray adhesive which makes it easier.

I'm sending this one to my good friend, Thelma, and it will need a padded envelope to survive the journey.

As always, I hope this post finds you well and happy and I appreciate your visit.

Until next time, take care.

March 24, 2021

Brainstorm

 Manila Tag 

 
A stripped layer of cardboard, a fussy-cut page from the Ephipany paper collection (Prima 2014), a vintage portrait (also fussy-cut) and my favorite book paper all tinted with inks and colored pencils are the ingredients used for this tag.
 
 
If you're inclined to use book paper in your art, may I recommend you search for a high-quality, very old book and you'll find that the paper will be strong, thick and tough enough to handle mixed-media techniques. Mine was an investment ($10 at a book fair), it has a leather binding and the pages have mellowed to a lovely color but are not friable.

The typewriter text was inspired by Simon's Monday challenge, this week it's using weather for inspiration. I looked inside instead of out and came up with "brainstorming."

As always, I hope this post finds you well and happy and I appreciate your visit.

Until next time, take care.

December 27, 2019

12 Tags for Christmas 2019 - Winter Wonderland


I've used a die-cut for this year's Tag #11 called Dancing Snowflake by Poppy Stamps.

I covered it with dimensional paint and glitter (Scribbles and Nuvo Glitter Drops) and, while it's hard to see, I put Glossy Accents inside areas of the snowflakes.


It sure seems like this was the year for using everything in my craft space that comes in a little squeeze bottle with a teeny-tiny spout!

The text is a Remnant Rub and the background paper was made by Martha Stewart and featured ombré colors (both products purchased long-ago).

December 18, 2019

12 Tags for Christmas 2019 - Believe in the Magic


So, all it takes is a prompt from Simon's Monday challenge and I'm off! This week's theme is "Cityscape" (add some buildings) and that was the inspiration for tag number eight.

The building image (Carabelle Studio Dans la Rue) was stamped on old book paper, tinted with inks and colored pencils then embellished with dimensional dots painted and glittered to look like Christmas string lights.


The little miss was cut from a Found Relative (Tim Holtz) and the kitty looks just like Howie, my cat, who turned 18 this month. It's Christmas everyday for this little guy who I spoil beyond belief!

December 02, 2019

12 Tags for Christmas 2019 - Be Good


Underneath the many layers of tints, texture paste and crackle medium is a mixed media die-cut (Tim Holtz) fashioned from brown card stock.

The frame is a Spellbinders die-cut covered with dimensional paint (Scribbles) which was also used on the large text (an image transfer).

Inside the frame is a Photobooth image (Tim Holtz), I used dots of Scribbles and Stickles (glitter glue) for bling and a strip of washi tape to balance out the intentional off-center placement of frame and text.


It will be easy to link-up with Simon's Monday challenge this week as I work through more of my holiday tags. The theme is "Let's Sparkle" and I've never made a Christmas tag EVER without using glitter--it just wouldn't be Christmas without it!

November 26, 2019

12 Tags for Christmas 2019 - Pine Grosbeak


The idea for this third Christmas tag for 2019 was a happy accident that I followed through on with a few deviations in between.  Let me explain.

I die-cut the holly (Tim Holtz Mixed Media Christmas) from a book page and placed it on top of some paper scraps. One of them was an enlarged half-tone image from a vintage book and I thought the various dots peaking through looked cool so I decided to use it.

The bird was cut from a vintage book. It was originally black and white and I added color with red ink and collaged over the branches. I've never seen this bird myself but they live in colder climates. Imagine coming across one foraging in the snow! I love birds :-)

I created an oval with dimensional paint drops (Scribbles) and painted over the outside section to create the vignette.

I distressed it with sanding, added the washi tape and a Remnant Rub and then made it an official Christmas tag by embellishing it with platinum Stickles.


I'm linking to Simon's "Tape It Up" Monday challenge.

Here's a link to Christmas tags from previous years if you'd like to see more (or use the link in the label section below).

November 24, 2019

12 Tags for Christmas 2019 - Twinkle


Making Christmas tag number two was a bit like decorating a cake! And since I used vintage buttons, I'm linking this one to Simon's Recycle challenge this week.


I began with a tag shape cut from some Tim Holtz Halloween paper (Abandoned) then I inked snowflake stencils with Versamark and embossed the shapes with clear powder.


The next step was to use a resist technique where you paint (or in this case, gesso'd) over the embossing and let it dry only slightly before wiping the paint off the embossed areas. Don't expect perfection with this technique--it's really meant for a distressed look.


My great Aunt Esther snipped many a button from her frocks over the years and I inherited quite a collection. I keep the little white buttons in one box and have another, bigger box with colored buttons in larger sizes. I gathered up an assortment and pasted them on.


I lightly tinted the background with Faded Jeans Distress Oxide and frosted the cake tag with glitter glues and dimensional paint (Scribbles and Stickles).


I always feel my tags need some kind of border. Since I used buttons, I reinforced the sewing theme by machine-stitching a mini zig-zag with green thread.

Stayed tuned for more tags--I appear to be on a roll--ha! Hope it lasts :-)

If you want to see my tags from Christmas pasts, here's a link.

November 12, 2019

Caring Hearts


A first for me--mass production of Christmas cards (25 to be exact)--what an experience!!

In the process, I learned what an A2 card size is (an 8-1/2" x 11" page cut in-half) and how to make my own envelopes. Woo-hoo!

I kept things simple by using animal images from a winter holiday paper pack and embellished them with dimensional paint and glitter glue.

All for a good cause as I'm forwarding them to the Caring Hearts Card Drive where they will be distributed to nursing home residents around the country.

The deadline was this Friday so I finished just in time!

October 09, 2019

Purple Martin


Autumn is Simon's Monday challenge this week and was the inspiration for this greeting card. I dug out an older (but favorite) paper stash by Tim Holtz called Wallflower and the bird (a Purple Martin), leaves and feathers were cut from it.

The background paper is this year's Halloween release from Tim called Abandoned. Run, don't walk to purchase (before it's all gone) if you like dark-colored, jewel-toned distress-looking paper.

I couldn't resist adding the book text. It accidentally showed up on my desk while working and it just seemed like karma to add it. I expect to use the card as a kind of "get well" greeting to provide words of encouragement.

The border was made with Copper Scribbles and Olive Branch Nuvo Crystal Drops.


To prevent warping, I pasted the various cut-out bits using tiny drops of a quick dry adhesive only where needed (on the floppy bits, etc.).

I also tinted the leaves ever so lightly with colored pencils and a bit of ink to alter their original neutral appearance.

October 01, 2019

Happy Birthday Thelma


Thelma (my good friend who got me started stamping) has a BIG milestone birthday coming up and this is the card I made for her.

Nothing ground-breaking to talk about technique-wise but I would like to mention the flower garland because it was hand-drawn by me after a few simple lessons from the queen of coloring books--Johanna Basford. She has a new book coming out this month that teaches her drawing methods.

I gave the garland some color with my Polychromos then cut it out and pasted it onto scrapbook paper.


The cardstock I mounted it on couldn't be a standard card size so I found some really great instructions here for how to make an envelope in ONE MINUTE. Really!

Then I decorated the envelope using inspiration from Kristina Werner and realize I need more interesting postage stamps for the next time I do this. (No pics for privacy reasons.)

I wonder if the post office would mind if I used a real stamp along with some fake ones like these? I'll have to try it and then let you know.

September 25, 2019

Fortune Cookies


What have I been up to lately? Making Asian-inspired paper-folded Christmas box ornaments that can hold a treat--of course!

It was the project idea I came up with after being invited to a guest spot on the The Funky Junkie Boutique blog. The challenge is "Treats Not Tricks" and here's the description:
  • Choose a theme and make something that will hold a treat for someone.  It could be a Halloween treat bag, a Valentine's candy box, a birthday card for a special person that holds a treat (could be a gift card "treat" or a bite of chocolate), anything that can hold a treat.
To make my box ornaments, I found some patterns here and used the Oriental Garden paper collection by Stamperia and lots of different glitter glues for decoration.

I used tracing paper and a scoring tool to transfer the patterns and quick-dry adhesive to hold them together after folding.

They looked rather plain in the beginning, but the real fun comes when you get out the glitter glue to decorate them. Nothing says Christmas like a little bling ☺!

Ornaments before decorating - click to enlarge


For gift-giving, I can tuck a treat inside or perhaps a note with a special wish or promise (kind of like a fortune cookie). Here are a couple examples of how the boxes open.


I look forward to seeing everyone's projects and encourage you enter the challenge--you might win a guest spot like I did and it's been a lot a fun. Thanks for stopping by!

August 25, 2019

ATC Writers


Today I'm sharing some "artist trading cards" and the inspiration came from this week's challenge at Simon Says Stamp. Making multiples might have been implied so there are nine of them.

Many times, I'll thumb through books I've collected that were saved from dumpsters to get ideas and use for collages. A page from a history book captured my eye.


I trimmed each picture to standard ATC size, pasted them on thick cardboard, encased them with clear medium, used gesso to bring out the details and tinted them with markers.


I stamped the backgrounds by masking the faces and the text came from the same book which offered up a summary of the author's style.


The feature that really represents my style is the use of dimensional dots along the border. If you trade cards like these and would like one just let me know--my email is in the sidebar.

May 04, 2019

Beautiful to Me


Let's just say you don't see these greeting card techniques everyday so I thought they might be worthy of a share. I made this card for my stamping sister, Thelma, using the new bottle of glitter that she had gifted me.

I stamped my images (Simon's new Delicate Flowers set) on purple cardstock, outlined the edges with Nuvo Glitter Drops, used bleach with a paint brush to lighten the colored paper, tinted the space with colored pencils (orange and green), and finishing up with a big ol' fussy-cut.


I mounted my cut-out on some Prima cardstock (Ephipany), used black Scribbles to bring out the stamens, and edged the card with thin dark grey paper and more Glitter Drops.

I've used Nuvo Crystal Drops before but this was a first for the glitter drops and I must say they are very useful for a number of reasons. First, the are very easy to apply--the fine tip and soft-sided bottle allow for good precision. Second, this stuff is tough! Even after using the bleach, rubbing in the tints, and cutting right next to it, the glitter never came off the paper. It reminds me of Glossy Accents with glitter in it.

April 24, 2019

Sending Hugs


I got side-tracked trying out a new stamp set from Simon called Delicate Flowers and ended up with a card I hadn't really planned on.

I'd been experimenting with coating thin papers with various mediums to use for collage. I had some rice paper, coated one side with fluid medium, let it dry and then decided to stamp it with my new set to make some masks.

After cutting the pieces out, I played around with tinting them and liked the result so I decided to use one of the flowers plus leaves on a greeting card. If you look closely, you'll see that the flower is transparent.


The background paper with the scrolls, bird, etc. is old stock from Prima called Epiphany.


I messed-up stamping the sentiment so I cut out that section, replaced it with a smaller square and re-stamped my text. A good save and one I'll remember if and when I mess-up again!


Yes, it looks handmade and it's a bit unconventional, but I'm dedicating it to all the encouraging commenters from my last post, embracing my greeting card style and learning a few tricks along the way.