/* */ Beulah Bee: Glossy Accents
Showing posts with label Glossy Accents. Show all posts

December 01, 2022

No. 4 for Christmas, 2022

I took inspiration for this tag from the cover of a vintage magazine (see it here). I traced the ornament design on watercolor paper and tinted it. I messed-up the background so I had to cut it out instead. It was pasted on Tim Holtz Christmas papers and embellished with Stickles.

As always, I hope this post finds you well and happy and I appreciate your visit.

Until next time, take care.

November 24, 2022

No. 3 for Christmas, 2022

I took inspiration for this Christmas tag from Paula Cheney and a piece she created several years ago for an Advent calendar (see it here).

I cut the wings from a vintage portrait folder and distressed with paint, sandpaper and crackle medium then mounted on paper, tissue scraps and fabric. The text was made with a Tim Holtz Christmas stencil and covered with Glossy Accents.

The crown was cut from a discarded book then covered with Stickles, Glossy Accents and Nuvo Crystal Drops. I outlined the edges with more Stickles and darkened them with a water-soluble graphite pencil.

The crowning jewel (so-to-speak) is a vintage button from my great aunt's collection.

As always, I hope this post finds you well and happy and I appreciate your visit.

Until next time, take care.

November 16, 2022

No. 2 for Christmas, 2022

Posting another Christmas tag today, this one inspired by a lovely make from Emma Williams (see it here).

The background is a scrapbook page, the wreath was hand-cut from cardboard then heat-embossed with metallic powders and trimmed with Stickles. 

I used vellum inside the frame that was lightly distressed with inks on the backside and stamped with heat-embossed text. The scroll is a Remnant Rub.

The holly was die-cut from watercolor paper using a Tim Holtz set called Mixed Media Christmas. After tinting with inks, I used a clear medium and Rock Candy dry glitter to give it some sparkle. The berries were made dimensional with Glossy Accents.

The border was machine-stitched, darkened a bit with distress ink and embellished with more Stickles.

As always, I hope this post finds you well and happy and I appreciate your visit.

Until next time, take care.

August 31, 2022

Seedless Preserves

I usually keep my posts short and sweet since there are many craft bloggers that provide step-outs with detailed instructions and most of my work isn't, as they say, "rocket-science."

But this time I thought my readers might like a more detailed explanation of how this tag was made.

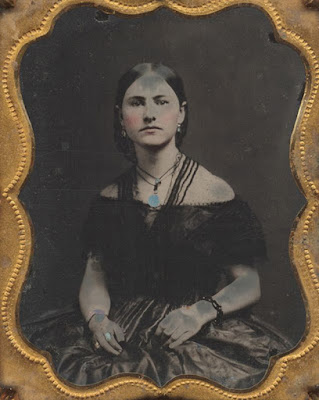
It began with an image transfer on heavyweight card stock after modifying this photo with Photoshop.

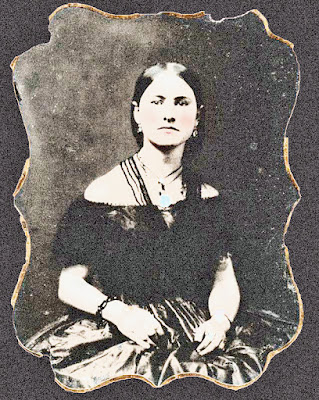
As you can see, the photo had damage (gray areas on flesh) that I corrected using the "film grain" filter followed by my usual image transfer technique. Here's the reversed image after editing.

I filled-in the hair on top of her head, redrew parts of her necklace and extended her eyebrows with waterproof black ink. I use a Uni-ball Vision Fine--it's been my go to for years. I scratched out the dark shadow beneath her chin and replaced it with lighter shading.

I trimmed and pasted tissue paper in the background using Tim Holtz Collage Papers and a Simon Craft Glue Stick. I seriously like these sticks--they have a long working time and clean up easy with water.

Her dress was decorated with plain white tissue paper stamped with dots (Tim Holtz Dots and Floral) and tinted with this post's title, Seedless Preserves Distress Stain. I don't think there is a more potent color in my toolbox than this one!

I made a mask of the woman's body so I could stamp the tree branches with birds in the background (Penny Black Winter Ledge). I painted over the bird bodies with white acrylic later tinted with light brown ink. I used inexpensive Pentel Oil Pastels to tint the background. They are mostly transparent (which is a great feature) and I just scribble on a bit and rub-in with a cosmetic sponge.

Some final tweeks include shading around the edges of the woman's face and arms to provide a little dimension and the addition of gold paint to her jewelry and the remaining frames edges. There's a spot of Glossy Accents on her turquoise medallion and the text is a Holtz Clippings Sticker.

I'm linking up to Simon's Monday challenge, this week it's Make Your Own Background.

As always, I hope this post finds you well and happy and I appreciate your visit.

Until next time, take care.

January 22, 2022

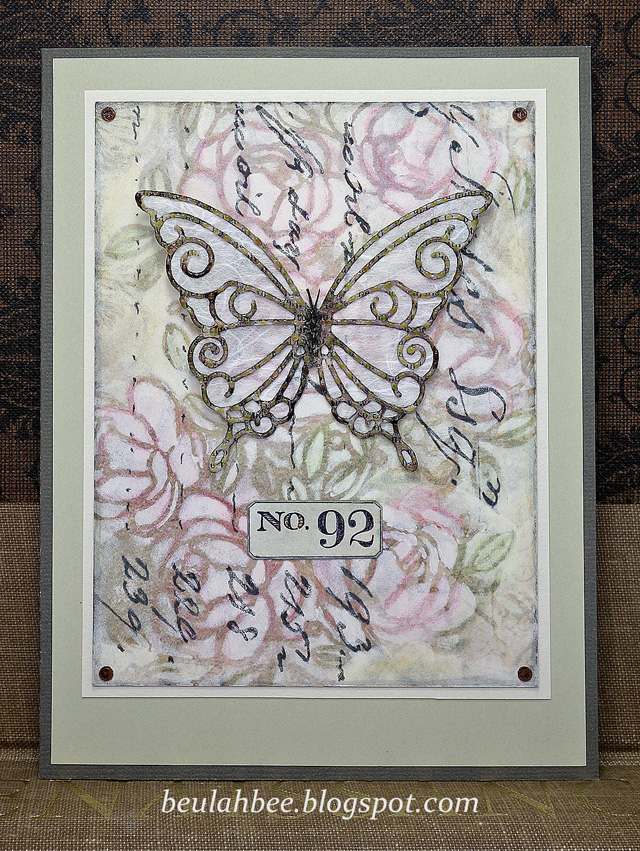
No. 92

Greeting Card

Mom turns 92 in about a week and this is the card I made for her. I used a stencil and white paint over a piece of scrapbook paper then tinted it slightly with colored pencils and inks.

I glued a scrap of white mulberry paper on the back of a die-cut butterfly then embellished it with glossy accents. The label was hand-made then stamped. The corner bits are just paper hole punches.

As always, I hope this post finds you well and happy and I appreciate your visit.

Until next time, take care.

December 18, 2021

Christmas Tags No. 4 & 5 for 2021

I pulled out all the stops with this tag: Crackle medium, bronze metallic paint, Glossy Accents, Liquid Pearls, Stickles, stamping, a die-cut, and ribbon. It has rich jewel-tones and looks better in person (it was hard to photograph). I made it for Simon's Monday challenge which is "Cold as Ice."

Next up, a tag celebrating Old Saint Nick with an unusual technique that warrants an explanation. The background was a Graphic 45 paper of holly and berries and I laid strips of plaid paper on top then edged one side with glitter. I think it adds to the vintage vibe.

I'm hoping to crank out a few more tags before Christmas and you can be sure they'll include some kind of glitter glue. I've discovered the hard way that once the bottles are less than half-full, no matter if you store them upside-down, they eventually dry-out so I might as well use them!

As always, I hope this post finds you well and happy and I appreciate your visit.

Until next time, take care.
December 05, 2021

Christmas Tag No. 3 for 2021

I chose a simple design for this tag to emphasize all the detail in the tree. It was fussy-cut from Stamperia's Christmas Patchwork paper and then embellished with Stickles and Glossy Accents. The background paper is a faded, vintage, handwritten note and the text is a Remnant Rub.

This is my last link up to Simon's Monday challenge which is "Sparkle Mode." I could use my glitter glues every day of the week and a challenge like this one is certainly a favorite!

As always, I hope this post finds you well and happy and I appreciate your visit.

Until next time, take care.
Christmas Tag No. 2 for 2021

A background paper by Stamperia (Christmas Patchwork), a stamped then fussy-cut poinsettia (Penny Black Christmas Star), Glossy Accents to cover the tile letters and lots and lots of Stickles makes this my third entry this week for Simon's Monday challenge which is "Sparkle Mode." 


As always, I hope this post finds you well and happy and I appreciate your visit.

Until next time, take care.
December 04, 2021

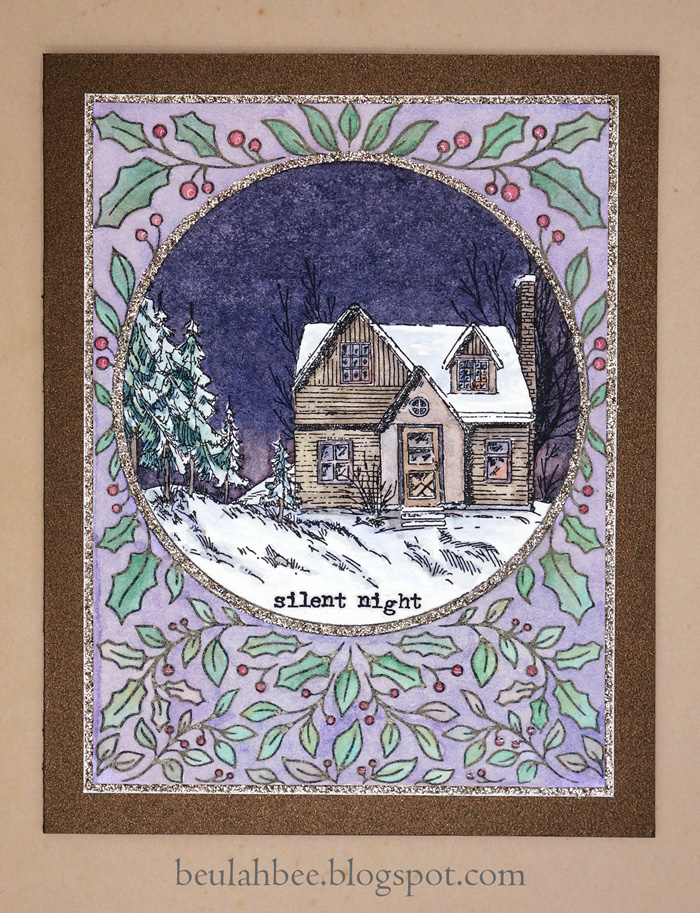
Silent Night

Greeting Card

Here's another try at a two stamp combo--this time it's a night-time version (see previous post for a look at my first try).

I lightened up the foreground stamping by using gray ink. I guess the next thing to try with this stamp might be a "no-line" watercolor version.

You might be curious to know that the dark sky was made by mixing ultramarine blue and orange lake and I lightened the tint at the horizon line to create the illusion of depth.

Greeting Card

As long as you have a tiny brush handy, painting small watercolor scenes like this one are fast, easy and very satisfying!

I mounted my stamping on bronze metallic cardstock and used champagne-colored Stickles so I'm linking up to Simon's "Sparkle Mode" challenge this week since I made something glittery.

As always, I hope this post finds you well and happy and I appreciate your visit.

Until next time, take care.

Stamp sources: Pink Fresh Happy Holidays Circle Frame, Studio Light Christmas Scenery

December 01, 2021

Peace

Greeting Tag

Two stamps, one piece of watercolor paper and paint, topped off with glitter glue, glossy accents and a Remnant Rub and I've just made another card for Christmas.

Greeting Card

I might make another one but I'd stamp the holly border much lighter or knock it back with paint because I feel it competes too much with the scenery focal point.

I'm linking up to Simon's "Sparkle Mode" challenge this week which is to make something glittery.

As always, I hope this post finds you well and happy and I appreciate your visit.

Until next time, take care.

Stamp sources: Pink Fresh Happy Holidays Circle Frame, Studio Light Christmas Scenery

February 10, 2020

She Loved Them All


Just four days away from Valentine's Day (and my wedding anniversary) and I still need to make cards for my hubby and my good friend (and fellow card maker) Thelma.

I guess I was warming up by making this tag and so I thought I'd share it with you today.

As always, I hope this post finds you well and happy and I appreciate your visit.

Until next time, take care. 

December 27, 2019

12 Tags for Christmas 2019 - Winter Wonderland


I've used a die-cut for this year's Tag #11 called Dancing Snowflake by Poppy Stamps.

I covered it with dimensional paint and glitter (Scribbles and Nuvo Glitter Drops) and, while it's hard to see, I put Glossy Accents inside areas of the snowflakes.


It sure seems like this was the year for using everything in my craft space that comes in a little squeeze bottle with a teeny-tiny spout!

The text is a Remnant Rub and the background paper was made by Martha Stewart and featured ombré colors (both products purchased long-ago).

December 08, 2019

12 Tags for Christmas 2019 - Christmastide


We've had a really rainy weekend here in the desert which made for a good time to get cozy in the craft room and make another Christmas tag.

I was channeling a vintage vibe with this one and used a page from an old German bible along with some fussy-cut paper from Graphic 45.


It was embellished with glitter glue, Glossy Accents and machine stitching and I used my typewriter for the text. I needed something to fill-in the bottom area and used a Stamp Collector stamp (Tim Holtz).

There's time to link yet again to Simon's Monday challenge for this week's "Let's Sparkle" theme.

May 02, 2019

Duplicate

Craft nerd (and big fan of tags) that I am, when I heard the Monday challenge at Simon this week was "Tag It" I jumped right in. I grabbed a scrap of Tim Holtz paper (Memoranda) and a couple of his stamps and boom--a tag was born!


After stamping, I machine stitched, drew lines, tinted with markers and colored pencils, added some tissue tape, ephemera (the cigar ring and buttons), and even a touch of Glossy Accents.

No plan, no rules, just spontaneous play and when my head is in this kind of zone I am happiest. Thank-you, Simon!

July 04, 2018

February 26, 2018

I Know


Love this little miss and those doe-eyes--she's included in the latest release of Tim Holtz Paper Dolls. She's sitting inside a Mini Cabinet Card that I fussy-cut and behind it is the backside of the card that I tinted to provide a darker backdrop.

The frame's scrollwork was embellished with a Picket Fence Distress Marker and Glossy Accents along with dots made with Scribbles. The butterfly was stamped, cut-out, tinted and crackled.


My starting point for this tag was trying out the new Idea-ology Worn Wallpaper and an attempt to achieve a peeling effect. That's cardboard as the base filled in with texture paste to simulate the look of wooden laths and plaster.

A Clippings Sticker, more dots of Scribbles and a piece of Lace Trimming were also used.

December 11, 2017

12 Tags for Christmas 2017 - Time of Wonder


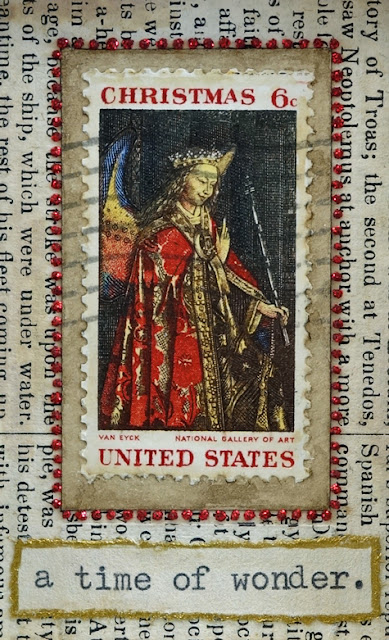
Back in the day, Christmas postage stamps were printed using an elaborate process without benefit of the digital equipment we take for granted today.

And, sadly, a beautiful series of stamps commemorating great religious works of art is not something I'd expect the post office to take on in this day and age.

Thankfully, we have postage stamp collectors (philatelists) who preserve this vintage art form like my Great Aunt Esther who saved the one I've used for the tag I share with you today.


It was mounted in a little box I made that was lined with old book paper and sits on top of Tim Holtz Ephemera and a page from his Tidings paper stash.

The holly, pine branches and calendar page were cut out of that same Ephemera collection. It's mounted on a red satin ribbon and embellished with Rock Candy Stickles and Glossy Accents.


I used Folk Art gold metallic paint (good stuff) to trim the tag, box and text edges. For the text, I originally chose a Clippings Sticker but botched it up so I made a new one using another relic from the past, a typewriter.

Well, as this is tag number eleven (and also my favorite), I've only got one more to go to complete the set. It will be an homage to Tim Holtz if there ever was one and I hope you'll tune in!

December 01, 2017

12 Tags for Christmas 2017 - Joy to the World


♪♫ ♪ "On the first day of Christmas, my true love sent to me ..." ♪♫♫♪

Ten years ago today, Tim Holtz began the tradition of blogging about techniques for creating 12 Tags for Christmas and I've continued to make them every year since then to decorate my presents.

This year, I decided to post them in 12 consecutive days beginning December 1st just like he used to do and my first tag features a simple, understated design with an early American or Georgian vibe.

The background is pearly paper with clear-embossed snowflakes (Kaisercraft Frosted) that was tinted with Faded Jeans Distress Oxide.

I coated the book paper die-cuts (Carta Bella Joy Wreath) with Glossy Accents and created additional contrast by using a blue gel pen and a water brush (which soaked in underneath).

I gave the entire surface a wash of dilute white acrylic paint and took advantage of the resist properties of the Glossy Accents by wiping the paint away from the die-cuts where there was overage.


I used a Remnant Rub to complete the phrase and made a frame border with 1/8" silver metallic ribbon (Offray) tinted with off-white acrylic paint.

To age the appearance a bit more, I rubbed on Frayed Burlap Distress Ink here and there and added some Liquid Pearls along the bottom for a touch of Christmas bling.

November 21, 2017

Christmas Snow


I love this tag. And it was EASY to make. Perhaps this post will inspire you to give the technique a try?

Prompted by Simon's Monday Challenge Blog, where this week's theme is torn paper, I began to search for inspiration on the web and kept seeing cupcakes like this one by artist Nancy Standlee.

Her post made me realize that an easy way to start a torn collage is by using an underpainting as a pattern you can follow for matching shapes and colors.

So, using this image as my guide, I tinted several pieces of vintage book paper with red, dark blue-greens, and brownish grays and set out tearing and pasting my pieces down.


The paper on the snowman's face and body is untinted--it is the actual color of this really old paper and the darker areas are the page edges where most of the discoloration occurs.

His hat accoutrements were cut from Tim Holtz ephemera and of course there's lots of Stickles. I also covered the eyes, nose and buttons with Glossy Accents and I'm glad I did.

Making this tag put me in the spirit and now I'm now ready to tackle the job of setting up the Christmas tree!

November 15, 2016

12 Tags for Christmas - January

Click to View Larger Version

Once again, I've made Christmas tags inspired by the Tim Holtz monthly tags which I use for decorating gifts.

This year's theme of remixing techniques helped me discover more ways to use my stash--holiday style!

The January tag featured a chalkboard/industrious metal combo with a word band.


This was the first time I've ever embossed metal foil (I didn't have die-cut equipment back in January) and it's an interesting effect. I always prefer a matt finish but since sparkles and shine are must haves at Christmas, this technique was really appropriate.

Without frosted embossing powder for the chalkboard technique, I tried to make do by embossing red vellum (bottom flower layer) with white ink and clear powder but the lines were too faint. Then I tried stamping white ink on red cardstock (top layer) which also faded some so I went over the lines with a Gelly Roll pen. What is it about white inks that make them so fussy?!

I combined the layers for a lush flower look and now I wish I had used green vellum for the bottom layer since Poinsettias have that look naturally. Maybe next time.

The rest, I think, is self-explanatory and here's a list of the products I used: Penny Black (Christmas Star), Stampers Anonymous (Christmas Words), Idea-ology paper (Merriment), cardstock, vellum, heat duct tape (metal foil), Sizzix Thinlet die (Mixed Media #2), Distress inks, acrylic paint, Scribbles, Stickles, Glossy Accents, a white Gelly Roll pen, and one tiny pink gumdrop.